Cross Hatch Cuutter
Negotiable Min Order Quantity Unit
- Required Quantity
-
- Place of Origin
- China
- Brand name
- BEVS
- Payment Terms
- T/T
- Production method
- Negotiable
- Shipping / Lead Time
- Negotiable / Negotiable
- Category
- Physical Measuring Instruments
BEVS Industrial Co.,Ltd.
- Verified Certificate
-
10

| Product name | Cross Hatch Cuutter | Certification | - |
|---|---|---|---|
| Category | Physical Measuring Instruments | Ingredients | - |
| Keyword | cross cutter , paint & coating remover , cross hatch cutter , paint cutter | Unit Size | - |
| Brand name | BEVS | Unit Weigh | - |
| origin | China | Stock | - |
| Supply type | - | HS code | - |
Product Information
1. Introduction
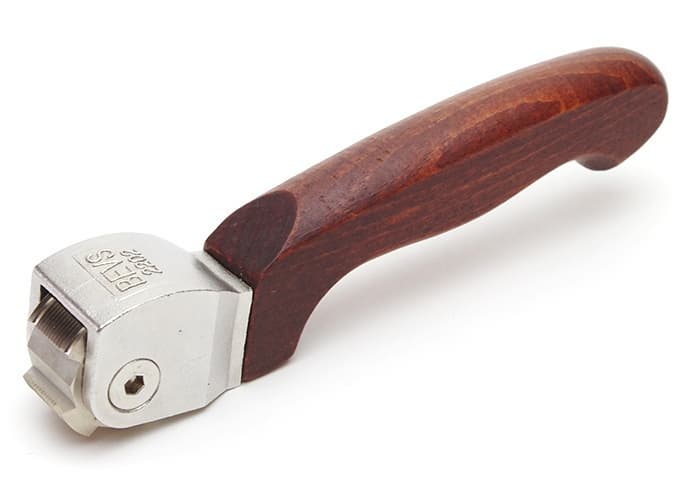
BEVS cross hatch
tester is designed for assessing the resistance of paint or related coatings
to separation from substrates when a
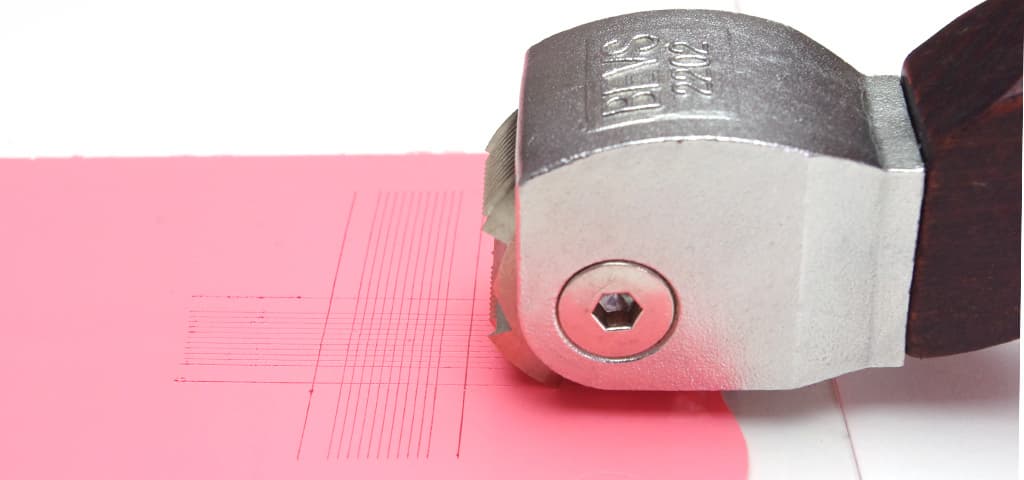
right-angle lattice pattern is cut into the coating, penetrating through to the
substrate.
When applied to
multi-coat system, assessment of the resistance to separation of individual
layers of the
coating from each other may be made.
2. Packing List
2.1
1 x Carrying Case
2.2
1 x Cross Hatch Cutter & Handle
2.3 1 x Magnifier (5X)
2.4 1 x Tape (3M)
2.5 1 x Soft Brush
2.6 1x Certificate of Conformity
3. Specifications
The Cross Cutters
Tester conform with the requirements of: ISO2409-1992,GB/T9286-98,BS3900 E6,
ASTM D3359.
In order to
achieve consistent results it is recommended that the test be conducted in accordance
with the stated test methods.
4. Preparation
for Test
The following guide will provide the user
with a working knowledge of how to conduct the test. These notes should be read
in conjunction with the stated test methods in order to obtain meaningful
results that can be used for comparative purposes.
4.1 Check for correct selection of cutter type:
2202/1 is
designed for hard substrates with a coating up to 60 microns.
2202/2 for
hard substrates up to 60 microns, with the benefit of 11 teeth to produce 100 squares, enables % values to be obtained
from the results.
2202/3 intermediate,
suitable for hard and softer substrates up to 60 microns.
2202/4 for
both soft & hard substrates with a coating thickness from 61 - 120 microns.
2202/6 for
both hard & soft substrates coating thickness 121 - 250 microns.
Obtain Pressure Sensitive Adhesive Tape (for hard substrates).
It is important that
the same specification tape is always used (the grade of tape supplied is the
same as specified in the standard test methods) in order that consistent,
comparable results are obtained.
4.2 Place the coated test panel on a rigid, flat
surface to prevent any deformation of the panel during test.
4.3 Before the test, inspect the cutting edge of
the blade for sharpness and condition. If the panel is of wood or similar
material, make cuts at approximately 45° to the direction of the grain.
4.4 Grip the cutter firmly, place the index finger
(if required) onto the cutter holder to enable even pressure to be applied to
the coating.
4.5 With the blade normal to the test panel
surface, apply uniform pressure on the cutting tool, draw the cutter at a
uniform rate across the surface for a distance of approximately 30 mm All the
cuts shall penetrate to the substrate.
4.6 Repeat the operation, crossing the original
cuts at 90° to them so that a lattice pattern is formed.
4.7 Brush the panel lightly with a soft brush
along each of the diagonals of the lattice pattern.
For hard
substrates proceed to step 4.8.
Soft substrates, carefully examine the
cut area of the test coating in good lighting
using normal or corrected
vision, (a lens of 3 or 5 times magnification maybe used). During the viewing process, rotate the panel so that the
viewing and lighting of the test area are not confined
to one direction.
4.8 If the test is made on hard substrates the
Pressure Sensitive Tape is too be used. (para 4.1 refers)
If beginning a
new series of tests, remove two complete laps of Pressure Sensitive Tape and
discard. Remove an additional length at a steady rate and cut a piece
approximately 75 mm long.
4.9 Place the centre of the tape over the lattice in a direction
parallel to one set of cuts, smooth the
tape into place over the area of the lattice and for a distance of at least 20
mm beyond with a finger.
To ensure good contact with the coating,
rub the tape firmly with a fingertip. The colour of the coating seen through
the tape is a useful indication of overall contact.
4.10 Within 5 minutes of applying
the tape, remove the tape by grasping the free end and pulling it off steadily
in 0.5 s to 1.0 s, at an angle which is as close as possible to 60°. (the 60° refers to the
angle between the tape being pulled off and the tape remaining)
4.11 Retain the tape for
reference purposes, for example by attaching it to a sheet of transparent film.
5. Evaluation of
Results.
The results maybe classified into 6 categories:
Cat
0. The edges of the cuts are clean
and smooth; no squares of the lattice show any detachment.
Cat
1 Detachment of small flakes of
the coating at the intersections of the cuts. A cross-cut area not greater than
5%.
Cat 2 The
coating has flaked along the edges and/or at the intersections of the cuts. A
cross-cut area significantly greater than 5%, but not greater than 15%, is
affected.
Cat
3. The coating has flaked along the
edges of the cuts partly or wholly in large ribbons, and/or it has flaked
partly or wholly on different parts of the squares. A cross-cut area
significantly greater than 15% is affected.
Cat
4. The coating has flaked along the
edges of the cuts in large ribbons and/or some squares have detached partly or
wholly. A cross-cut area significantly greater than 35%., but not significantly
greater than 65%, is affected.
Cat
5 Any degree of flaking that
cannot even be classified by classification 4.
For
multi-coat systems the evaluation should review the interface at which flaking
occurs.
Note.
the categories stated are based on ISO 2409 test method, for more complete definition of test it is recommended that the
user refer to the stated test methods.
6. Limitations.
The Cross Hatch Cutters are not suitable for coatings thicker than 250
microns or for textured coatings.
7. Routine
Maintenance
Inspect the Cross Hatch Cutter for wear to the
edges of the teeth, also any damage.
New cutter teeth have flats machined into the
apex of the teeth, the width of which is nominally 0.05 mm,
Through use the width of the flats will
increase and the cutting edge will loose it’s sharpness, check flat width not
to exceed 0.1 mm. Where they are in excess of this size, a new cutting edge
should be selected. Replace cutter accordingly
8. Calibration
No
calibration of this instrument is required, inspect for wear see para 6.0.
9. Further
Information
For more
information regarding this product, spares, accessories etc. or if you would
like a catalogue listing our full range of products, please contact your local
agent or BEVS Industrial Ltd .
10. Order
Information
BEVS2202/1C Cross Hatch Cutter (1MM 6Blades)
BEVS2202/2C Cross Hatch Cutter (1MM 11Blades)
BEVS2202/3C Cross Hatch Cutter (1.5MM 6Blades)
BEVS2202/4C Cross Hatch Cutter (2MM 6Blades)
BEVS2202/6C Cross Hatch Cutter (3MM 6Blades)
B2B Trade
| Price (FOB) | Negotiable | transportation | - |
|---|---|---|---|
| MOQ | Negotiable | Leadtime | Negotiable |
| Payment Options | T/T | Shipping time | Negotiable |
- President
- Owen Chan
- Address
- Rm1818, Dongcheng Int’l Plaza,No.3, Huangpu East Road,Guangzhou City, China
- Product Category
- Electronic Measuring Instruments,Measuring & Analysing Instrument,Testing Equipment
- Year Established
- 2004
- Company introduction
-
BEVS Industrial Co.,Ltd. is a leading manufacturer that specializes in coatings, ink, painting, resin testing instruments and laboratory whole solution.We offer the complete and unique products in this field to meet customer's challenging demands of today and tomorrow, the products are complied with the standards of ISO, ASTM, DIN, BS, EN etc.With strong supports and hard work by lots of end-users and worldwide agents, BEVS become more and more famous in the world and provides more competitive values for our customers.
- Main Markets
-
 Australia
 Japan
Japan
 Viet Nam
- Main Product
Related Products
S-Beam Load Cell
Truck Weighing Load Cell
hardness tester
Non-Contact Type Rotary Torque Sensor

Vibration Monitoring System


 China
China
